What is A/B Campaign?
A/B Campaign is a method for testing which subject, email message or any other element of a marketing campaign performs better. For example, you might write three different Subjects on the subject line and different “from names” and “from addresses.” You would then run these versions at the same time and collect data about which led to more conversions.
You can’t know for sure if a change will improve your campaign’s performance until you test it. When it comes to the details, though, you need to test different ideas to determine what will work best for you.
A/B Campaign testing is important. It allows you to test your actual campaigns with your real audience and gives you data to back up the decisions you make.
So, how do you run A/B campaign for your marketing campaigns? Here’s a basic process you can follow.
1. First, you have to login to your account using your username and password provided by your client success manager. Assuming that you already uploaded your email message and contact list into the system.
As you can see on the screenshot below, there are numbers on each box which were arranged chronologically. You just have to follow where the numbers will lead you.
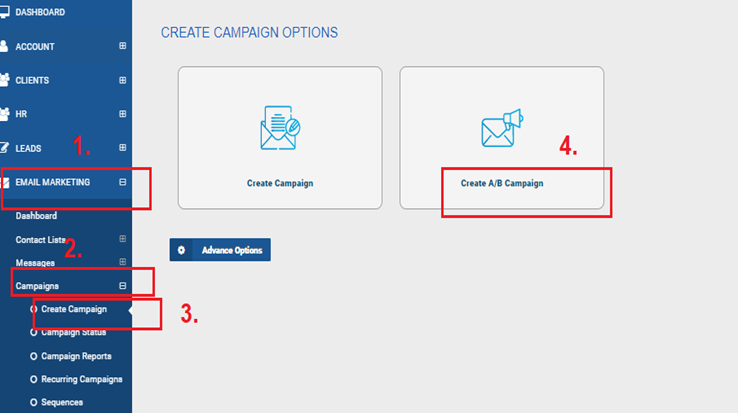
2. After you’ve clicked the Create A/B Campaign, you will be directed into this page. Now, this is where you are going to put all the necessary information to create a successful A/B Campaign.
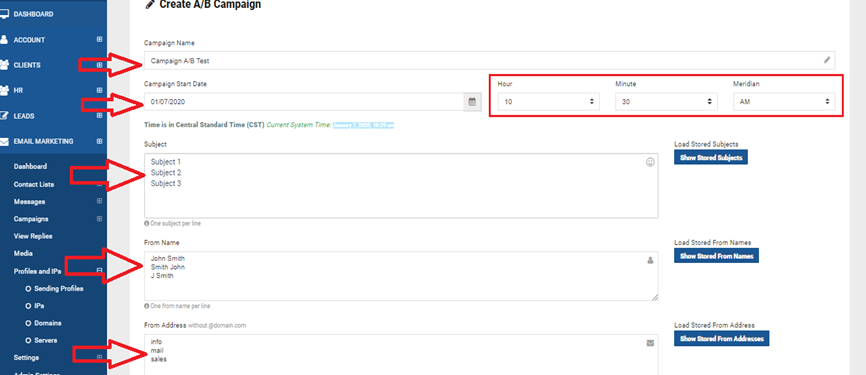
Campaign Name – This is the first field where you can put the name of your campaign. In this example I input “Campaign A/B Test”, you can customize this depending on your preference.
Campaign Start Date – The second field is the Campaign start date. You can automatically set-up your campaign start date, hour, minute and meridian anytime you want but I highly suggest to send out the emails during office hours.
You have to keep in mind that this is on the CST time zone by default. You can change the time zone in the settings.
Subject – In this field, you can input different subject lines you like to test which among them performs better. It should be at least 2 subjects.
From Name – this field is totally customizable, it can be your full name, your company name, or the brand name that you are promoting, and it’s up to you to decide. What this does is when the recipient looks at the From Name it will say in this example that it is from John Smith.
From Address – this field is basically the email address that the recipient will see when he looks at it, in this scenario, it is info @ sending profile.
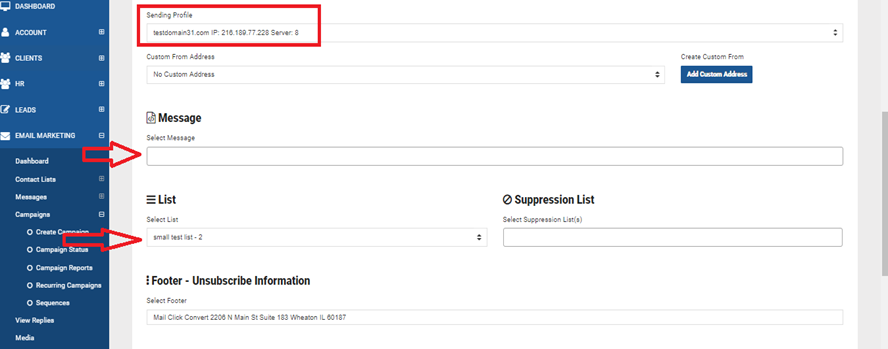
Sending Profile – this field is the domain/s that we have set-up in your account. For example, the domain that we have set up is testdomain.com. So the from address is just the prefix before the sending profile. This is also customizable so you can use any from address that you prefer.
Assuming that you have already uploaded the email message that will be sent out. Click on the field and choose the message that you will be sending out. See the screenshot below for your reference.
Same as the list, assuming that you have already uploaded the list, click on the field and select the list that you want to use to send out the campaign.
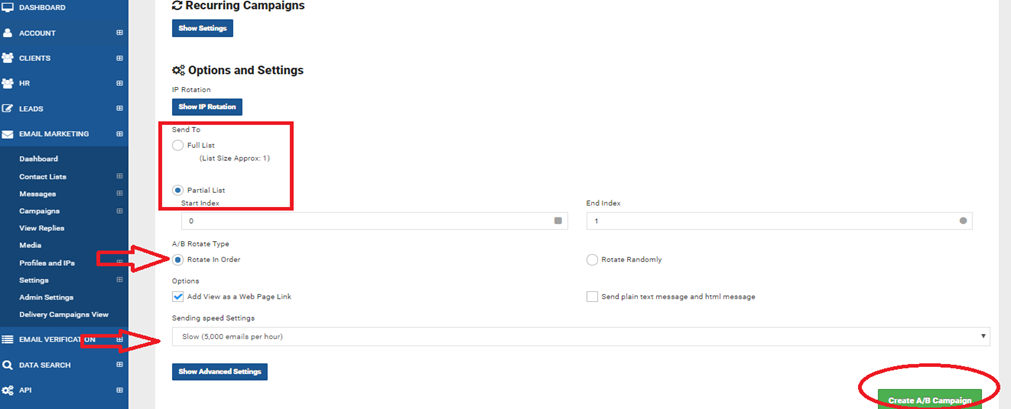
3. Now let’s go to the last part. You will have an option to send to the full list or partial list.
In the example below, I selected partial list so the Index option will display. Let’s say you will send it to just 5k of your list initially, but the size of your list is 20k in total. What you have to do is click partial list in the Start Index then input number 1 in that field and in the End Index field input 5000. What it will do is, it will be sent to the first 5k records on your selected list. But if you want to send it in full, then select Full list.
You have an option of what kind of rotation you would like to happen on this campaign. First is Rotate In Order which means, whatever information you entered on the subject line, “from name” and “from address”, it will send in the order it was written, unlike the Rotate Randomly option, which is the opposite of it.
Also, if your email template is graphically designed, it is highly suggested to check the Add View as a Web Page Link checkbox. But if your email template is only composed of plain text, you can leave it unchecked.
The last field is the Sending Speed Settings. Assuming that this is the first campaign that you will be launching, it is highly recommended to use the standard speed which is the Sloth (120 emails per hour).
Once done, click Create Campaign button.
If you need anything just reach out to your client success manager. You can also reach out to our support team at any time by submitting a ticket. Here is how: Login to your MCC account > Main Menu > Support > Submit Ticket
- Log in to post comments