
Warning: If you park your domain any active domain, email service, or any other service tied to that domain will not work anymore.
Create two nameservers at your domain registrar.
ns1.yourdomainname.com and ns2.yourdomainname.com
Then point those two nameservers to one of your sending IPs.
Last point the domain to the new nameservers ns1.yourdomainname.com and ns2.yourdomainname.com
Below we have guides for Moniker, Namesilo, 1and1, Godaddy, Enom and Namecheap
Creating Nameservers at Moniker.com
Step 1. Login into moniker then in the sidebar under “Domains” click the “Manage Nameservers/DNS”.
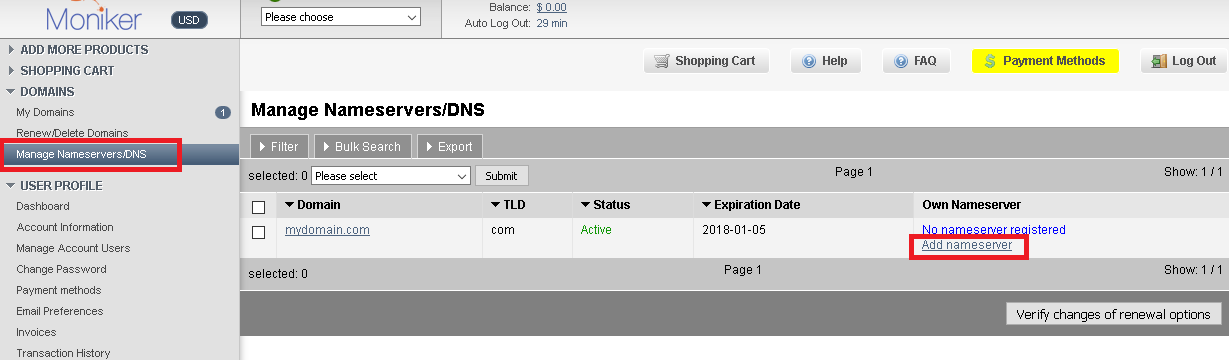
Step 2: In the “Manage Nameservers/DNS” page click on the “Add Nameserver”.
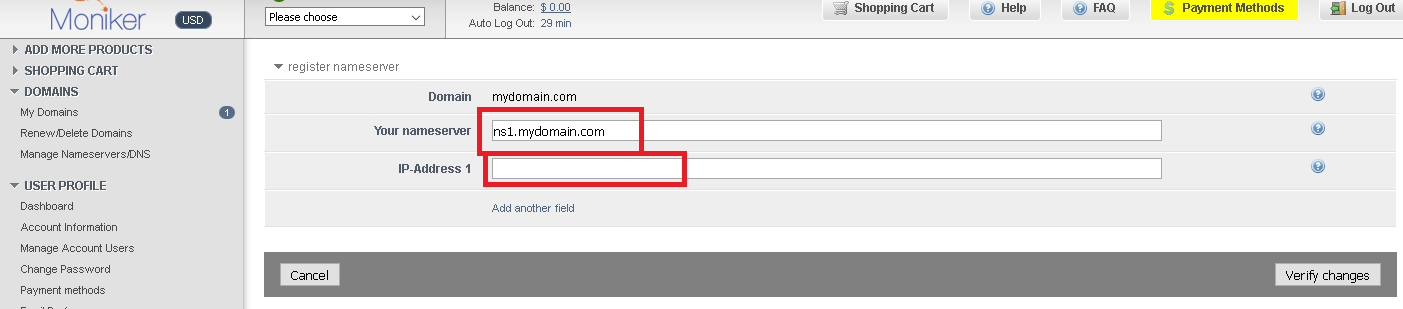
Step 3: In the “Add Domain Name Server” page enter the domain as ns1.mydomain.com replacing yourdomain.com with the domain that you want to park and set the IP address to the IP that you want to use on your account Repeat this process for setting up ns2. We only require two nameservers and they can both have the same IP.
Step 4: Go back to the “Manage Nameservers/DNS” page and click on your domain name and this will take you to modify domain page. Select external nameservers and enter ns1.mydomain.com and ns2.mydomain.com replace mydomain.com with your domain name
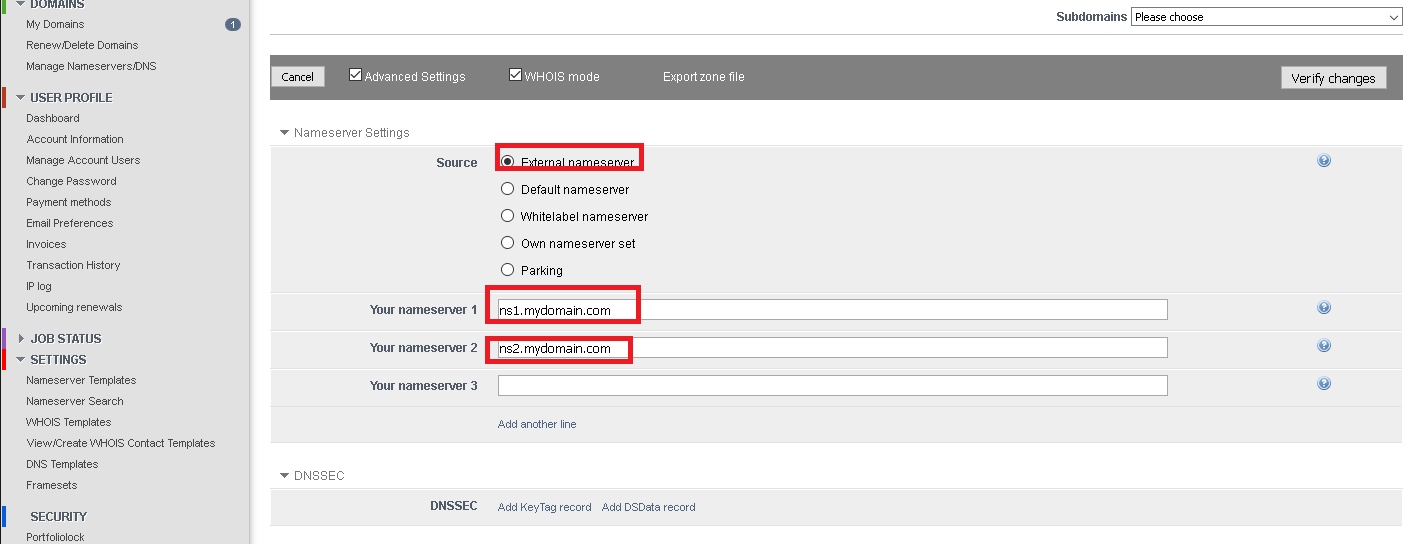
Step 5: Your domain is now ready. Just let us know in a support ticket what domains you want setup and how you want the IP’s setup as well
Creating Nameservers at Namesilo.com
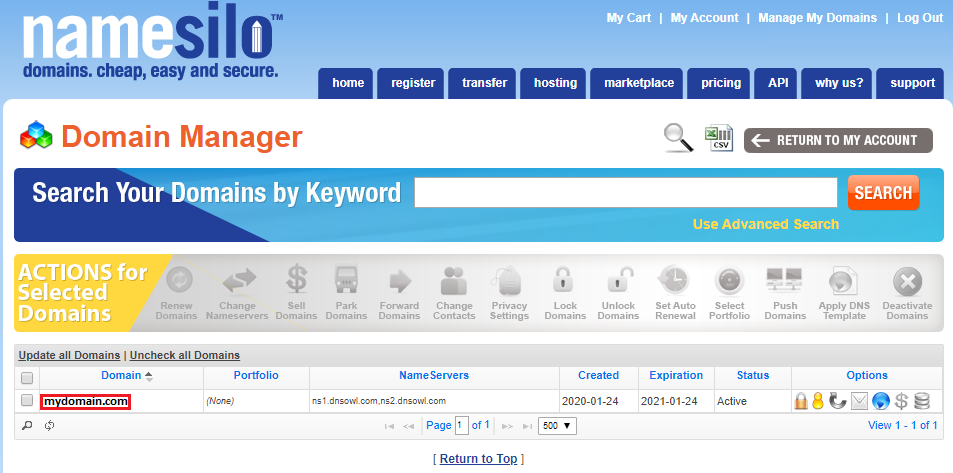
Step 1. Login into NameSilo then click “Manage My Domains”.

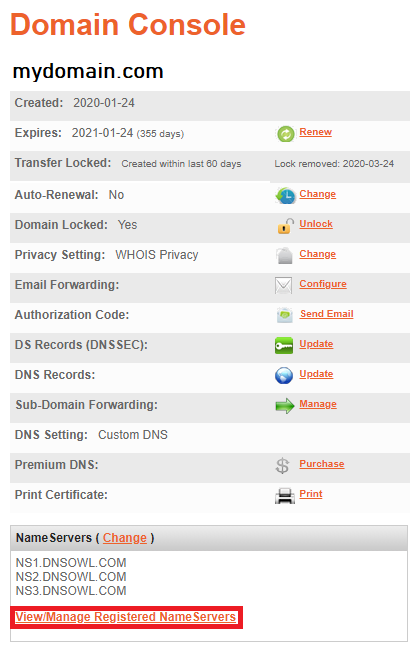
Step 2: In the “Manage My Domains” page click on the domain name you want to setup to access to “Domain Console” page.
Step 3: In the “Domain Console” page click on “View/Manage Registered NameServers”
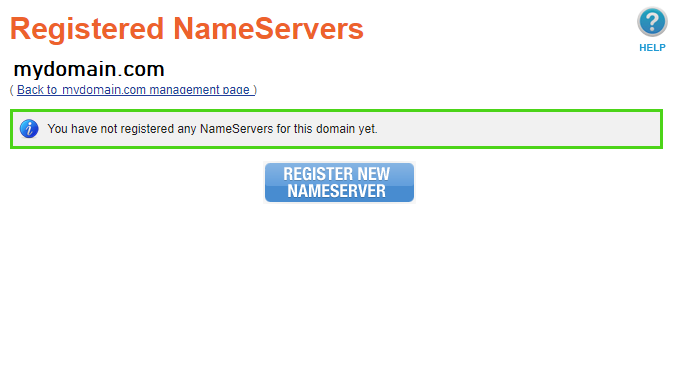
Step 4: In the “View/Manage Registered NameServers” page click “Register New Nameserver”
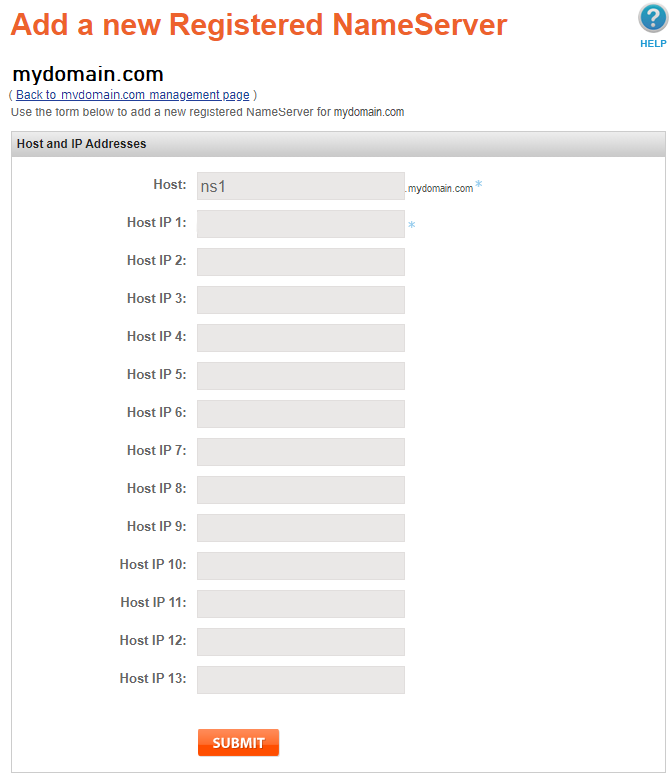
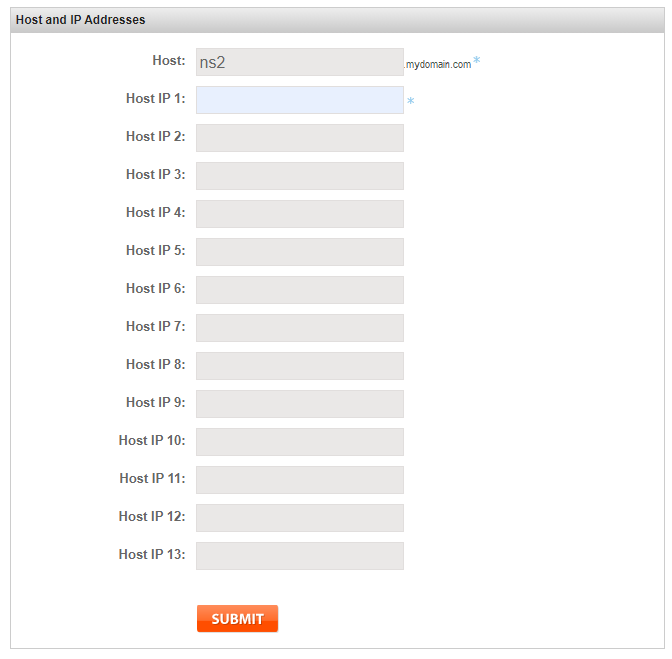
Step 5: In the Host text box type “ns1” without the quotes. Then enter the IP address you want to use in the text box for Host IP 1
Step 6: Repeat the same process for ns2. Click “Register New Nameserver” once again.
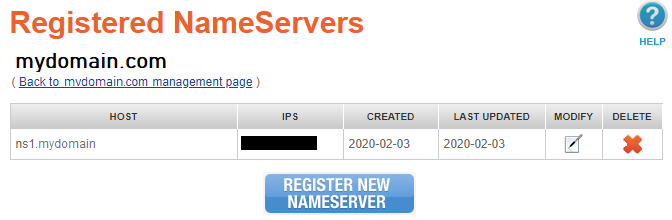
In the Host text box type “ns2” without the quotes. Then enter the IP address you want to use in the text box for Host IP 1.
We only require two nameservers and they can both have the same IP.
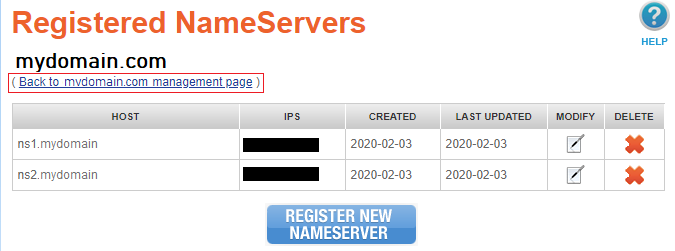
Step 7: Next go back to your domain name’s management page.
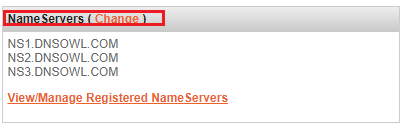
Step 8: Click on “Change” next to NameServers.
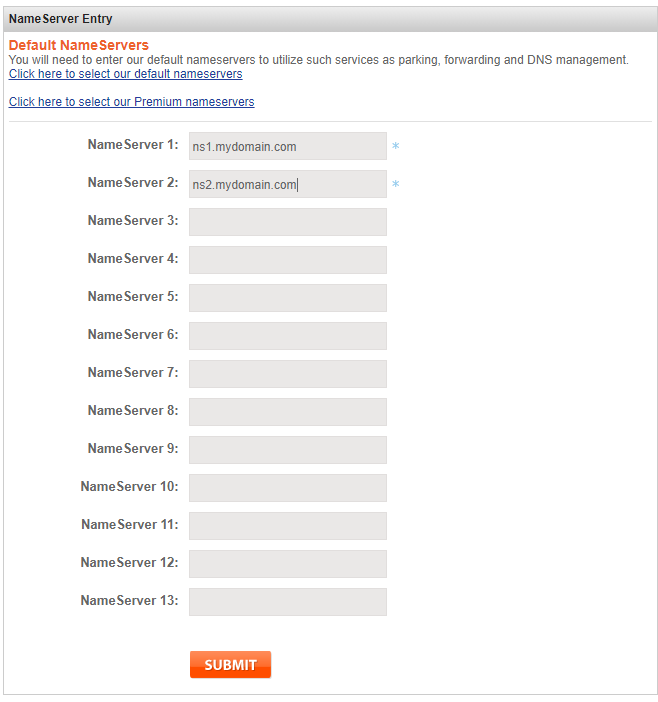
Step 9: Enter ns1.mydomain.com and ns2.mydomain.com replace mydomain.com with your domain name and click submit.
Step 10: Your domain is now ready. Just let us know in a support ticket what domains you want setup and how you want the IP’s setup as well
Creating Nameservers at 1&1
Here is how you set your private name servers for domains registered with 1&1.
- Log into your 1and1 account.
- Go to your domain manager. Depending on the type of package you have, the way you get to your domain manager may be slightly different.
- Select “New” >> “Create Subdomain”.
- In the empty box, type “NS1?.
- From the dropdown box, select the domain for which you are creating nameservers.
- Select “OK”.
- Repeat steps 3 through 6 for “NS2?.
- Check the box next to NS1.YourDomain.TLD.
- Select “DNS” >> “Edit DNS Settings”.
- In the “Advanced DNS Settings”, select “Other IP Address”.
- Enter the IP address of NS1.
- Click “OK” then “Go To Overview”.
- Repeat steps 8 through 12 for NS2.
- Check the box next to the domain you wish to point to your private name servers.
- Select “DNS” >> “Edit DNS Settings”.
- In the “Basic DNS Settings” section, select “My name server” from the dropdown menu.
- In the “Advanced DNS Settings” section, find “Primary name server” and enter NS1.YourDomain.TLD.
- In the “Advanced DNS Settings” section, find “Secondary name server” and enter NS2.YourDomain.TLD.
- Click “OK” then “Go To Overview”.
- It can take up to 48 hours for your new private nameservers to propagate.
Creating Nameservers at GoDaddy
Watch the video tutorial below on how to create nameservers at GoDaddy.
For a detailed step-by-step guide, please click here.
Creating Nameservers at Enom
Creating or registering private nameservers must be done with the domain registry where the domain name resides. To create. For example, ns1.youtdomain.com here, the domain yourdomain.com must be at this REGISTRY.
Click on the LOGIN link.
Enter your enom.com LOG-IN ID and PASSWORD in the boxes provided, then click LOGIN.
You are now logged in to your account.
Click the DOMAIN link at the top left side of the page.
Select ADVANCED TOOLS.
Now click REGISTER A DOMAIN NAME SERVER.
Scroll down. Enter the new domain server in the NAMESERVER box.
Now enter the new nameservers associated IP ADDRESS in the provided box. The IP address should have been provided to you by your web host.
Click the SUBMIT button to have the new nameserver created.
When finished creating the nameserver, you’ll have to REPEAT the process to register your second name server. Registering private name servers requires you to register TWO SEPARATE NAMESERVERS (i.e.: ns1 and ns2) each with its own unique IP Address.
Remember that after you submit your new nameservers and IP Addresses to the registry, IT CAN TAKE 24-48 HOUR for the new nameservers to propagate after you make these DNS changes.
Creating Nameservers at Namecheap
Step 1: Log into your Namecheap account. Click “Domain List” in the left sidebar (or hover over “Account” in the top right and choose “Domain List”).
Step 2: Find the domain you want to park and click the “Manage” button next to it.
Step 3: At the top of the domain page, click the “Advanced DNS” tab.
Step 4: Scroll to the bottom of the page to the “Personal DNS Server” section. Make sure the drop-down is set to “Standard Nameservers”, then click “+ Add Nameserver”.
Step 5: In the window that opens, choose “ns1” from the Nameserver drop-down. In the IP Address box, enter the sending IP you want to use on your account, then click “Done”.
Step 6: Click “+ Add Nameserver” again, choose “ns2”, enter the IP address, and click “Done”. We only require two nameservers and they can both have the same IP.
Step 7: To confirm both nameservers were created, click “Search” next to Standard Nameservers in the Personal DNS Server section. You should see ns1.mydomain.com and ns2.mydomain.com listed with your IP.
Step 8: Creating the nameservers does not point your domain to them. Click the “Domain” tab to go back to the domain’s main page. In the “Nameservers” row, change the drop-down to “Custom DNS”.
Step 9: Enter ns1.mydomain.com and ns2.mydomain.com, replacing mydomain.com with your domain name, then click the green checkmark to save. If you don’t click the checkmark, the change will not be saved.
Step 10: Your domain is now ready. Just let us know in a support ticket what domains you want setup and how you want the IP’s setup as well. Nameserver changes can take up to 48 hours to propagate.
Note: Namecheap only accepts IPv4 addresses for personal nameservers in their dashboard. If you need to use an IPv6 address, contact Namecheap support.